Friday 2 December 2016

Turbo "vent"ilation!

When we purchased Eleanor we knew we were going to have to do something about the fridge vent as not only had it badly yellowed but was only really held on in three corners as one had broken


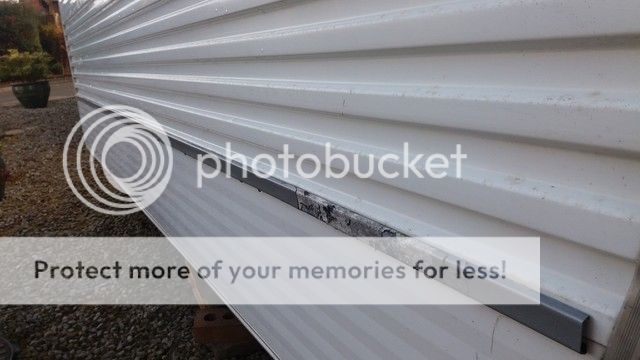
As par for the course the vents are no longer available and it was a very odd size so nothing new would fit. Also there was only 1 vent, now a standard installation has 2 underneath each other allowing air to pass over the elements and aid cooling, so the fridge was going to be a little disadvantaged.
In addition the gas vent did not guarantee to vent outside which I prefer for safety reasons
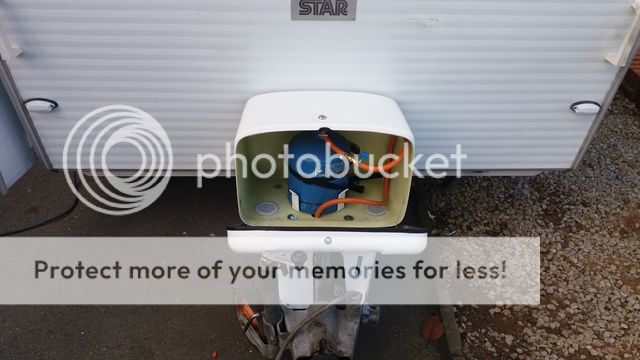
So it was time to have a ponder. I came up with the idea of using a plastic back plate to which everything else would be attached.
The only really available material in white sheet form which would laser cut was perspex which by nature is brittle and it took three attempts to get to the end of the process without breaking it!
I made up a cardboard template which with assistance from my talented daughter we converted into a computer design which Rebecca laser cut for me at work from 3mm material.

The first job was to remove the vent cover and its mounting and then clean up the area.


What this photo also shows albeit faintly is a top tip for getting the mounting holes in the right place on the perspex. Stick two strips of masking tape one vertical and one horizontal over each hole and draw a straight line along each bisecting the hole. then tape the mounting plate over the top and transfer the lines onto that . This means that the holes should be exactly in the right place. If they are out by much you will be trying to screw at an angle (sorry!) and the perspex may crack which I found out myself.


Drilling the perspex needs to done with care and on a flat surface starting with a small drill and working up to the size needed. Drill all the holes before going any further.
Now the next stage was giving an option to improve the air flow in hot weather. This was done using 2 computer fans sourced from ebay. This is quite a common modification on modern caravan especially by people touring to warmer climes.
These can be wired via a thermostactic switch but I opted for a simple on / off switch mounted under the sink. These were mounted to the back of the plate.


Next top tip is to make sure they are the  right bl**dy  way round otherwise they will suck rather than blow! I wonder how I know that!
On my third attempt I used some self adhesive neoprene strip as a seal.


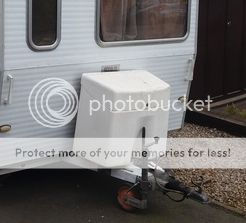
This set up was the offered up and carefully screwed into place fitting a second hand gas vent obtained from a local breaker


After that it is just a case of fitting the covers again using the neoprene strip as a gasket. I am quite pleased with end result.


Wednesday 30 November 2016

New Trim or the Art of Lateral Thinking!

When we acquired Eleanor the various lengths of side trim were either pretty rough or completely missing


It soon became clear that the coated plastic trim was no longer available, so that left a bit of a quandry as we needed something.
I considered using a curved aluminium extrusion screwed to the side of the van or even a modern rubbing strip that took a rubber insert which was available from a motor home parts supplier on Humberside, but neither of these were remotely authentic so I was scraching my head a bit for an alternative.
Much "Googling"then ensued using a whole variety of search phrases, until  found an image that actually seemed to match the profile I was after, but it was nothing to do with caravans.....
This is the ultimate piece of lateral thinking! The product I found was called "Genesis Listello" which is an aluminium extrusion which is used in ceramic tiling when you want to put a decorative metal insert into a section of tiling. See the link below

http://www.trimtraders.co.uk/other-trim-types-18/listellos.html

One of the these, the slightly curved aluminium one came as an exact size match to the original plastic stuff and it was not frighteningly expensive


So the requisite amount was duly ordered and arrived next day, great service from Trim traders.
The next problem was how to fix it on. The original plastic clips, which are also no longer available, would not be man enough for the job and where the trim was missing they had been cut off and filled over. So more Googling ensued focusing on car trim clips
I came across a small business in Loughborough called Bresco ( www.bresco.com) who specialise in just about any form of clip you can think of for classic cars especially. Their unit is literally floor to ceiling boxes of clips and fastenings a real Aladdin's cave, and Howard could not have been more helpful when I headed down with a sample of trim. After trying several alternatives we found a metal clip designed to hold mouldings on old Vauxhall cars! so money changed hands and I left with a bag of goodies

Now the side trim will have to wait until I have painted the side stripe between them but the front I could do now as this was missing

The clips are a rivet fixing so 3 mm holes were drilled taking care to ensure they were in exactly a straight line!
Before each clip was riveted on a small amount of sealant was put over the hole


This photo also shows the old clips filled in on the right.
After that it was simply  a case of clipping the new trim in place and job done


I have to say I am well chuffed and think the finished job when the sides are done will look great

Saturday 5 November 2016

It's a Gas!

When we bought the Lady Eleanor (aka The Star) the gas cylinder was located inside the van on a shelf under the sink connected to the appliances by flexible pipes one of which needed replacing by 1989! In addition there were remnants of gas piping underneath indicating its original location was outside.
Now I know that gas inside is not unusual in caravans of this era but I am not comfortable sleeping in a van next to a gas cylinder powering a fridge when "off grid", indeed one the requirements for the Puck we bought was that it should be a model with the outside gas cylinder.
So the gas needed to go outside. Additionally Eleanor had  a hideous contemporary but not original storage box on the front that needed to go, picture below
So a plan was hatched . First the old box was removed along with the rotten wooden battens that held it in place.
Sourcing a suitable replacement was more problematical. Gone are the days where aftermarket caravan boxes are available so moving onto "white Boxes" in general a motor cycle top box came to mind but few were big enough. I found one made  a guy called Keith Gold (www.keithgold.co.uk)who kindly tried various gas bottles inside in varying orientations before selling it to me. Below is how it arrived with me


The space into which it had to fit was made tighter with the fact that the handbrake comes up pretty vertical. So it was pretty clear it would not fit lid up as on a bike, which was what I suspected before I bought it so it had to sit on its back and needed raising of the fairing to allow the lid to open.
So I made a frame out of stainless steel cut to size courtesy of my daughters fiance. The box was then fixed on top and bolted in place


Inside I cut two drop vents and used the mounting frame from inside along with a fixing strap. Meantime a local caravan service engineer moved to gas point to a suitale point outside.
Overall I am pretty pleased with the result.


Wednesday 19 October 2016

To Catch a Fallen Star

How did I end up buying another caravan? Well personally I blame Chris and Cameron from the Retro Caravan Club, who imported a French Star earlier this year. This was undeniably cute and had a fold down bed which I found bizarrely appealing!
So I just happened to be browsing e bay as you do and spotted another Star on sale ending that evening. OK it had a fold out out bed rather than a pull down one so I was hooked and SWMBO (Alison) did not dissuade so I put in a snipe bid and despite the best efforts of another Retro club member Colin (oops) I won it.
I would stress I was stone cold sober and broke every rule by buying blind. This could have ended in tears.
So armed with a laptop to transfer the dough  me and camper trekked down to near Didcot to collect it. Fortunately there were no nasty surprises so money changed hands and I connected something with all the aerodynamic features of a house brick to the back and we set off home

Seen here at Cherwell Valley services on the way back

Well what does it look like? Below are a selection of images most from the original advert


It also came with its French Log book. confirming it was built in 1975 and imported into the UK earlier this year.


So what sort of condition is it in? Well fortunately it is bone dry and nothing appears broken. As usual all gas, water and electric show the usual French eccentricity so will need some work. The hideous and not original front box has bitten the dust and is about to be replaced.
Obviously parts are not as easy to find so some lateral thinking will be needed. So far much hunting on French websites has sourced replacement outside lights and these are the first to be replaced. The front ones and one of the rears came from a specialist French outlet
http://www.retroptic-auto.com/fr/


So what of other jobs? Well....
Curtain Fabric  - Arrived
Upholstery fabric - arrived
Curtain rails -arrived
Missing outside trim - Cunning Plan! - more later
Gas - Being professionally sorted as I write
Electricity - Not as bad as I first thought so hopefully just convert to UK
Water - I have a plan
New Gas Box  - Cunning Plan ! - more later

There will undoubtedly be more so watch this space

Also from hence forth it will be called "Eleanor"

Friday 3 June 2016

Thornthorpe Caravan & Camping Site

This is a Caravan & Camping Club CS site located at the Thornthorpe Equestrian Centre just outside Malton in North Yorkshire.
We first visited last year as we have assorted family in the area but never got round to writing a review then, owing to illness.
It was so good we returned for the late may bank Holiday.
The site is located in the Orchard behind the Farm House and from a level section ideal for caravans it slopes down to a brook at the bottom.

As a CS they can accommodate 5 vans and 10 tents although the space is so large you would never feel cramped.
The site is absolutely immaculate and has hook ups and a small purpose built toilet block with two washroom / toilets and a wet room style shower room. with a washing up area behind


The grass is kept pretty short and they have just opened a second adjacent paddock for when they are busy
Andrew and Tracey could not be more helpful checking up to be sure you are OK, especially as it is a busy farm and equestrian centre, and their son Ryan is the demon grass cutter!
Other nice features include a wood burner / BBQ hire service should you need it.
We met as a family group with 3 caravans and a tent.

A great time was had by all, it actually managed to stay dry for the whole weekend but by the Monday night when we were the only ones left it was bitterly cold and windy and we therefore had a lousy night with our neurotic dog.
There is lots to do in the area being on the edge of the North Yorkshire Moors and our visit coincided with the Malton Food Festival where many local goodies are available to try, buy and then eat or drink.
we can especially recommend Rhucello (www.rhucello.co.uk) which was AMAZING as a rhubarb liqueur, as they claimed great with Lemonade, Ginger beer  or (hic) Prosecco! we had to go back the next day and buy some more.
Monday was the Retro Festival at the Driffield showground with amongst other things a good classic car show with some excellent "ordinary" classics, Mark 3 escort anybody? Including a couple of VW Campers which attracted a lot of attention, but no classic caravans (hint!)
So a really great break and we have all booked again for August Bank Holiday!

Thursday 26 May 2016

Retro '70's stuff!

The danger of joining the Retro caravan club is the temptation to buy assorted 70's tat, sorry memorabilia.
Needless to say been busy on eBay. Firstly some fantastic Orange Gaydon Melmex

This was swiftly followed by a Sona hob top coffee percolator


We were then looking for some chairs but prices were silly especially as we could find none at the local car boot. Then found this pair for £12

Even yellow to match the camper!

Then lastly felt we needed some 70's music, of course played on a cassette player so....


So I think that's enough....... For now!

Monday 16 May 2016

Kitchen Worktop Trim Replacement

Whilst we were away the other weekend I wasn't too careful with the positioning of the Beauclaire oven on the hob resulting in melting the white rubber trim that surrounds the kitchen worktops

This not surprisingly was a bit of a b*gg*r!
Searching around on tinterweb revealed that this stuff was not available from the usual sources and I could only find it elsewhere in odd colours.
The solution was remarkably close to home, the camper in fact! Westfalia trimmed their units in a very similar material and surprise surprise it was available by the metre from various VW specialists I sourced mine from NLAVW via Fleabay. Wesfalia use a thick and thin rubber t section depending on the location the one you need is the thin. So ordered it duly arrived

The old trim simply pulls of once you gently start it with a crew driver. Be careful the trim can be more firmly attached to the laminate than the work top, so bits of this can break off.

To attach the new trim simply feed it into the slot and tap in place using a rubber mallet.


 Two top tips here. Firstly cover the face of the mallet in duck tape or similar this keeps the trim clean.
Secondly if you can take the worktop off it makes getting a smooth finish easier than trying to hit with a mallet at various strange angles.
The end result is shown below. A pretty straightforward operation and a better fit than the original!

Wednesday 11 May 2016

Retro Caravan Club

We have never really been ones for going on organised camps. The exception being a couple of visits to Camperjam and Vanfest / Busfest. These are of course big shows with weekend camping.
We Joined the Retro Caravan club first on Facebook and then as a club a couple of months ago and thought we would break the habit of a lifetime and attend a rally.
 The venue was Firtree Farm near Banbury. This is a pretty good site on 3 levels with a toilet block between the two lower levels, It is set around two fishing lakes. The facilities were located in a portacabin cleverly fitted into an old barn which was then re roofed. They consisted of 4 self contained unisex washrooms each with a loo, shower and washbasin, which always seemed to be well serviced and clean.
Whilst the weather was bitterly cold and windy the welcome could not have been warmer, with 13 or 14 vans in attendance most pulled by something equally retro.
Chris, Cameron and co. need a great job of organising with just the right level of events to ensure a good weekend was passed, The bacon butties were especially welcome. Some pictures below


Colin and Julies Royale with the social "tent"


Whilst we were there I paid a quick visit to the British Motor Museum. I had been before but wanted to see how it had changed with opening of the new exhibition hall. Well what a disappointment! The layout of the main building has been altered to give  a new entrance which resulted for example in the time walk of cars finishing in the eighties. The new building essentially resembles a two story car park with cars packed tightly in rows. The downstairs Jaguar exhibition, consisted largely of a series of first or last models from the sixties upwards models obviously deemed not important enough to be in their main museum in Coventry. Upstairs was a range of cars either evicted from or chosen to not be important enough from the main exhibition and again a series of first and last late model Land Rovers.
So generally not impressed. The best exhibits to me remain the concepts that didn't quite make and of course the Monte Carlo mini Coopers. A few pics below

A30 sports tourer, every panel pretty much hand made

A potential Triumph Toledo / Dolomite replacement
A great display

And Finally the Monte Minis

In all I have to say it was a really enjoyable weekend with some good company and we are looking forward to our next meet up in Derbyshire in June